Background

Sunday, July 22, 2012

Project Kitchen Organize!

     While all the flooring chaos has been going on in our house (see my blog here!) I decided to let my OCD monster loose in our kitchen cabinets. We have gorgeous cabinets in our house, especially in the kitchen, and they're built amazingly well. Both super strong and also a great combination of cabinet space/big deep drawers/little drawers, but after living here for a few years stuff got all jumbled up and messy.
     I can't do messy as a continuous state. Temporary mess, that's fine. Mess that you have to deal with for the foreseeable future, no way. So I bought a collection of shelf organizer racks at the Mart of Wal, and went to town. I swapped out the casserole dishes from a bottom-shelf cabinet with the baking pans that were in the big bottom drawer. It was driving me nuts having to dig out EVERY casserole dish we owned, EVERY time we needed one, just because the one you needed was always on the bottom of the stack. Once swapped, the casserole dishes fit perfectly one per organizer rack slot, my cupcake and baking pan collection and five different bundt pans were actually accessible instead of all jumbled on top of each other, and the world was at peace once more. Once I got all the rest of the cabinet squared away, I was pretty happy with my day's work.

These racks/dividers are four dollars and change at Wal-Mart. Miracle tools.

Top shelf has vertically stacked cake pans on the racks, no more digging through them in a big old drawerful of pans and other baking related odds and ends.

All the muffin/cupcake tins, square brownie tins, and even my heart shaped tins stack up pretty and neat. Underneath are the pizza baking stones we never use got from The Pampered Chef waaay back when people used to have Pampered Chef, Tupperware, all those kinds of parties. 

The whole cabinet. Most used bundt pans in the front, as well as the nice serving bowls there. Stuff like springform pans for cheesecakes and older glass bowls we don't use much get back-cabinet duty. 

There used to be a ton of junk mail, old phone books, lunch boxes, you name it under there with the casserole dishes. It was kind of a catch-all whenever we needed to clean the table off in a hurry. You all have one of those spots, for those 'Quick, hide this mess, your Aunt So-and-so just drove up!' moments. Now you know it's been majorly cleaned and organized if I'm getting down and taking a picture of inside my kitchen cabinets to put on a public post for the world to see! It's like you're all going to be digging through my cabinets haha!


This is a huge drawer built under the oven. Formerly the home of the baking pans, pie plates, etc. Now it holds only casserole dishes, all lined up so you don't have to take every single one out just to get the one you needed. Just slip out the one you want, slide it back in once you take it out of the dishwasher. This might be my greatest idea for my home to date. (Yes, we have ENTIRELY too many casserole dishes. Never in my memory have we actually used them all, or even half of them, at once. Maybe it's like a collection thing?)


The cookie sheet/mixing bowl cabinet. Formerly the cookie sheet/muffin tin cabinet. Now our pans stack up without sliding all over the catty-whompus tins that leaned every which way up under there, and we have room for the mixing bowls we use all the time. The mixer is up on the shelf there as well, along with parts to the turkey fryer and the meat tenderizer contraption thing only my dad can put together.


My mom had the bright idea to use little Command hooks inside our cabinets to hang things like our strainers and frying pan covers...way better than them running around loose taking up space.
Lucy got curious as to why I was down on my knees with my camera looking in our cabinets haha.

She also hung one in our measuring cups/baking tools drawer for hanging our measuring spoons on. No more digging around in the bottom of the drawer for tiny spoons!

And it worked great for hanging up the weird kitchen utensils that don't really fit into drawers well and are too strange shaped to lay flat in a cabinet, like the ginormous cheese grater we have here.


This is technically in our pantry, not our kitchen, but it still counts. More command hooks to hold all my baking racks.

And plenty of storage to hold all my cake decorating goodies!


     Needless to say, I am much happier with our kitchen now! Organization is amazing.

Tuesday, July 17, 2012

New Dining Room

     It's been a busy busy BUSY two weeks en la casa de los Falkners. We decided a while back to have our dining room floor redone, since I'm so handily hooked up at the flo' sto' and all. Our dogs had been using our rarely used, out of the way dining room as an occasional pit stop without our knowledge, and once we found out about it our wood floors were not in a good shape. We have rather nice wood flooring throughout the house, except for the bathrooms, laundry, and kitchen. So, of course we weren't exactly pleased when we found out we were having to rip up our dining room floor. My parents finally picked out a tile we all liked and that went with the red walls, the wood entryway floor, and the neutral kitchen tile. And we packed up all our chairs and china, moved the table and china cabinet - not the easiest thing, and got settled in for a week of dust and noise.
     Three days of working men in our house later, the fun process of re-installing the two-piece china cabinet, and cleaning, recleaning, and rerecleaning the floor...

The wood floor of the entryway (what used to be in the dining room) next to the new tile

The empty floor once we got the china cabinet back installed. It took a fair little bit of Dremelling and shoving to make it fit in the same cut-outs in the baseboards it came out of. Seems the new tile was a few millimeters taller than the old wood, so it threw off our old cutout heights...fun stuff!

Full room view...pre table and chairs. No, we don't keep our curtains tucked up in the windowsill on one side, that side was mopped under and the curtain was trying not to get wet.

     We just love it! My mom has been mopping constantly since we got in in, trying to get the last bit of grout residue off so we can show it off haha.

Monday, July 16, 2012

Southern Woman Adventures: Canning Tomato Soup

     To this day, I can't tell you what plain old Campbell's tomato soup tastes like. We only buy it as a base for mass-makings of soups or something like that. My whole life, we've had something better. Much better. Homemade, fresh from the garden, canned in jars tomato soup. This is one argument I'm definitely siding with the food purists on. No preservatives, no fakeness, just tomatoes, a little sugar, a little salt.
     This year the tomato crop at Larry and Barbara's (my grandparents) has exploded. We picked two buckets full Saturday, and so did about five other people my grandparents let 'borrow' from their garden. All evening long we washed, pulverized, strained, and stewed tomatoes. End result, eight quart jars and seven pint jars full of tomato soup :) Oh, and tomato soup and cornbread for supper too!


We begin! With tomatoes...lots and lots of tomatoes...

And a brand new food processor! We got this bad boy on sale for $30! I'm in love.

Washed first...

Found this little guy with a nose like Gru  O>

Chopping

I'm enjoying actually being able to properly chop something in my house again.

Molly decided she needed to help...first we learn knife skills, very very carefully, under big sister's wise teachings :) We need all ten fingertips!

Smell it? What's is supposed to smell like?
A tomato, Molly, a tomato.

The second huge bowl of quartered tomatoes we chopped

Testing out the food processor...and man was that fun! 

Tomato mush

First attempt at finding a successful strainer in the house...not successful.

This strainer is much better. The juice actually goes through the sieve!
We did end up with a proper strainer later on...much later on...but this method got us a good bit of juice.

First stewer of juice to cook!

All our tomato juice, ready to be boiled and bottled.

Almost done!!!

This stuff was hot as boiling lava!

Not a bad day for our first go at doing this, I'd say :)
I'm going to be eating happy this year.


Sunday, July 8, 2012

Classified Ad: Dobro for Sale!

     Hello readers! This isn't my usual post type, but bear with me for a few.

     I'm have an expensive, beautiful dobro that I bought year before last in a moment of creativity or insanity, whichever you prefer to think of me as, and I have yet to do anything amazing with it. I bought it thinking it would be unique to play and easier on the fingertips than learning to play guitar (and it is), and thinking that with all the free time I had it would take no time to pick it up.
     However, in the last two years my life has been nothing short of constant chaos, making it a little difficult to devote the kind of time you need to practicing learning a new instrument. Also, the dobro didn't exactly fit my bill of a versatile instrument (there aren't many dobro parts in contemporary Christian music, for example, and it's not much of a one-man-band instrument - you're pretty much always someone's harmony part or background).
     So, my dad suggested that I put it up for sale and try my hand at something else for a while.

     What we have here is a Gold Tone Paul Beard PBS-D Signature Series squareneck dobro/resonator guitar. It was set up by Paul Beard in shop, label is signed by him. Maple body, ebony fingerboard with deluxe inlay. Comes with pickup installed, Gold Tone hard case, dobro slide, and beginner book/DVD. Bought new, and has been played maybe twice since I brought it home.
     MSRP on this is $973, and the case retails for $138. I'm offering these together, $700, with all the accessories. If you're in North MS and want to look at it and/or play around on it before making a decision, I can arrange for that to happen.

Full body of dobro


Close up of keys and detail

Inlay on neck and fretboard

More inlay detail

Dobro and case


Patio Project - Phase 1

 
     At the Falkner house, we've decided to undertake the huge project of extending our back patio. When we initially built our house we only built on a small back porch, thinking we'd eventually get to doing this. Our back is in full, hot sun in the late afternoon, so it's hard to use the back porch when we actually want to use it. Our idea is to extend the part attached to the house straight out about sixteen feet, then from there turn left and go out to meet the corner of our house with a pergola, with the entire extended part dropped about a foot and a half below our slab to follow the slope of the hill down and perhaps partially decked out. We're planning to have a firepit, a table and chairs for eating outside, a daybed swing, a place to hang the hammock we've had for years and never put up, and of course plenty of space for sitting around in our swings and chairs.

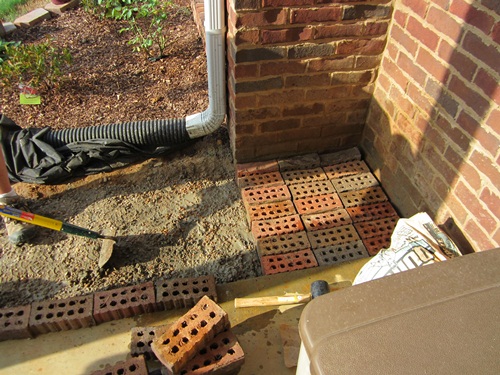
     Phase One of the patio project was to extend the already concreted pad out a little bit, about two by five feet, with some of the bricks left over from building the house in this little alcove area between our patio and my bedroom's box window. We needed the extra room to be able to scoot the grill out and not have it crowding the area we have our patio furniture in. So on the Fourth of July while we were all off work, even though it was hot as bajeesus, we started to work.

Molly 'working'...haha

After scraping the place flat and laying a bed of Quick-crete, we start laying brick.

Mike working hard doing the manly parts of the job

Almost finished

Done! One smooth brick patio extension. I'm hoping to maybe help it look a little less new with some DIY moss or something, but it'll have to be less than 110 outside for that to happen. 

We didn't all fit in the camera frame because we're so hot and sweaty we didn't want to be ANY closer to each other.

Ah, who cares if we're nasty and sweaty? Kisses all around!


Some of our inspiration pictures:


I'm already excited about the daybed swing. Just imagine all the quality napping that'll happen on this thing!

I'm really excited about these wine bottle planters. I've been saving bottles for AGES, and I've got a dremel bit perfect for poking holes in glass. I just need the weather to cooperate!


Hey yall, if you happen to drink lots of drinks with metal tops, save them for me! I'm making one of these! Lol I've been paying real close attention to the asphalt in parking lots lately looking for these. It's better than hunting for change :)